Windows 11 Installation For CIS-107
How to create an installation media?
You will need an iso file that you will then “burn”/extract into a flash drive/disk/drive that will be used for the installation.
- What is an iso file? An ISO file is a single archive file that is an exact, uncompressed copy of an optical disc like a CD, DVD, or Blu-ray. It contains the complete file system structure and all the data, making it a perfect replica. ISO files are used to archive, distribute, or install large software or operating systems without needing a physical disc, as they can be “mounted” as a virtual drive or burned onto a new physical disc. Source: Wikipedia
Microsoft provides the ISO files for Windows 10 and 11. You can download an ISO fit for your computer by using the Media Creation Tool, or you can download a multi-edition iso from here. The page will give you 3 options. We will go over the Media Creation Tool and the Multi-Edition iso.
How to create an installation media with the Media Creation Tool
- Before you start, you will need an 8GB flash drive that you can erase, and you will need to download the Media Creation Tool
- Start the application and accept the license

- Select the language and region. The media tool will select the defaults based on your computer. If you plan to reinstall Windows on the same computer, keep the defaults. If you plan to install the same version of Windows on a different machine, deselect the defaults.

- Select between a USB Flash Drive or an ISO file. If you want to burn the ISO into the drive directly, then select the USB flash drive option. If you want a legit copy of Windows to install using a different application or for a virtual machine, then select the ISO file option. In this guide, I will select the USB Flash Drive option because this is a reinstallation flash drive for this computer, where I want the default Microsoft Expected experience.

- Now select the flash drive. It is recommended that if you have any other flash drive connected, to disconnect it to make sure you don’t accidentally wipe the wrong drive.

- Now just wait till it’s done.


How to create an installation media with Rufus
- What is Rufus? Rufus (The Reliable USB Formatting Utility, with Source) is a free and open-source portable application for Microsoft Windows that can be used to format and create bootable USB flash drives or Live USBs. Source: Wikipedia
- Why would I use Rufus over the official tool? The short answer is: Because it is better. Rufus allows you to customize the installer and works for other operating systems too. It also allows you to bypass Microsoft Requirements for Windows 11 so that it can run on unsupported hardware. BE AWARE: This is not the legitimate way of installing Windows. Do this at your own risk and understand that running Windows in unsupported hardware is something Microsoft does not condone and can lead to updates and version patches not be available to your installation of Windows 11.
- Download Rufus from here
- Follow the screenshots on their website to prepare your installation media
Ventoy
Ventoy is a free and open-source tool that creates a bootable USB drive from which you can boot multiple ISO files directly, without needing to format the drive repeatedly.
You can download Ventoy from here
Bios/UEFI
BIOS (Basic Input/Output System) and UEFI (Unified Extensible Firmware Interface) are firmware interfaces between a computer’s hardware and operating system. They initialize hardware at startup and hand control to the OS bootloader.
BIOS
- Legacy firmware from the 1980s.
- Stored in the motherboard’s ROM chip.
- Initializes CPU, memory, storage, and peripherals.
- Loads the first 512 bytes (MBR) from a storage device to start the OS.
- Uses 16-bit real mode, limiting performance and addressable memory.
- Supports drives up to 2 TB and uses MBR partition tables (maximum 4 partitions).
- Text-based setup interface.
UEFI
- Modern replacement for BIOS, standardized around 2010.
- Stored in flash memory, updatable like software.
- Uses 32- or 64-bit mode, enabling faster booting and larger memory access.
- Supports drives larger than 2 TB using GPT (GUID Partition Table).\
- Offers a graphical interface and mouse support.
- Supports Secure Boot (cryptographically verifies bootloaders).
- Can load drivers and applications directly from the firmware layer.
How do I access the BIOS/UEFI of my computer?
This depends on your computer. Most computers allow you to access the BIOS/UEFI menu at boot time by pressing one of these keys (this is not a comprehensive list and can change):
| Manufacturer | Common Key(s) |
|---|---|
| Acer | F2 or Del |
| ASUS | F2 or Del |
| Dell | F2 |
| HP | Esc or F10 |
| Lenovo (Laptops) | F1 or F2 |
| Lenovo (Desktops) | F1 |
| MSI | Del |
| Gigabyte | Del |
| Samsung | F2 |
| Sony VAIO | F2 or Assist button |
| Toshiba | F2 or Esc |
| Microsoft Surface | Hold Volume Up on power |
BIOS EXAMPLE

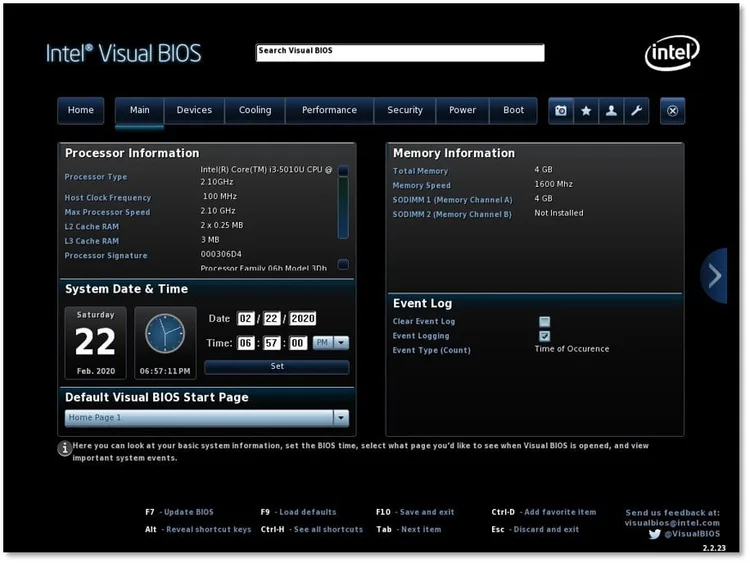
UFEI EXAMPLE